Using the Mobile Touch Client
|
The Mail Mobile Touch Client application is used on touch-capable mobile devices. Its features are a subset of the features found in the Web Client (including Mail, Contacts, and Calendar). General functionality of the Mobile Touch Client includes the different layouts you will see when using a tablet or mobile device, switching applications (such as going from Mail to Contacts), and using search. Using a Tablet - When viewing items within Mail or Contacts on a tablet, there is a list panel and a reading pane. Calendar uses a single panel to show a day or a month. The layout you see when using Mail or Contacts depends on the device and its orientation:
Using a Mobile Device - A mobile phone only displays one panel regardless of its orientation. When an item is viewed, its panel fills the display. Tapping the Inbox button on the toolbar brings the list back into view. Please Note: All screenshots seen below were taken with an Android mobile phone. Your actual display may appear a bit different based on the mobile device you are using.
We have included step-by-step instructions below on tackling the most common touch client features. Please see Most Common Mobile Touch Tasks listed to the right. Click on a feature description (e.g., Using Mail) and it will allow you to jump to specific instructions below. Then, click the browser back button to return to the top of the page. 
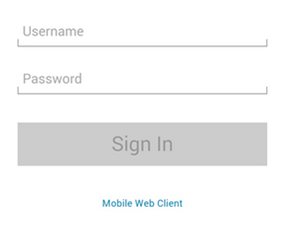
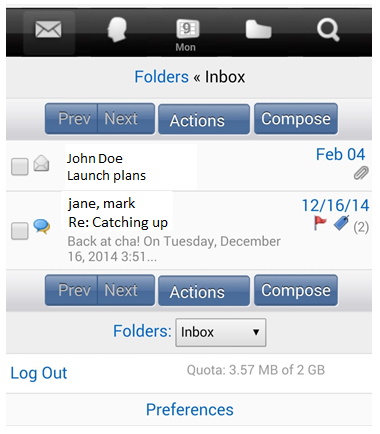
How to Log InStep 1. To access the Mobile Touch Client, log into your mail with the URL for the Web Client and the touch client is automatically detected How to Use MailWhen using Mail, you can view a list of conversations, read a conversation, compose a new message, reply to or forward a message, and perform various actions on either conversations or messages such as moving or tagging them. Reading Mail - Your Inbox displays conversations in the list panel. To read your mail, tap the conversation you want to read and it displays in the reading pane. Using Conversation List - Mail is displayed as a list of conversations. Features of the list include:
Viewing a Conversation - A conversation is displayed as a list of messages in the list pane. The toolbar on top has buttons that allow you to reply to or forward the conversation, move it to Trash, or perform other actions such as tagging it, flagging it, moving it, or marking it read.
Composing a New Message - To compose a new message: Step 1. Tap the Compose button and a dialog displays Step 2. In the To field, enter the recipient’s email address. The address auto-complete feature displays a list of suggested email addresses. Step 3. In the Subject field, enter a brief description of the email message Step 4. Compose your email message Step 5. If you want to add an attachment, tap the Attachment button and select your attachment 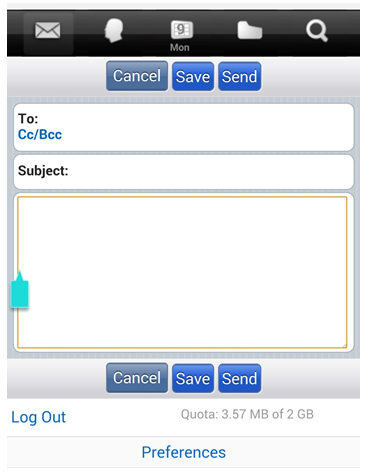
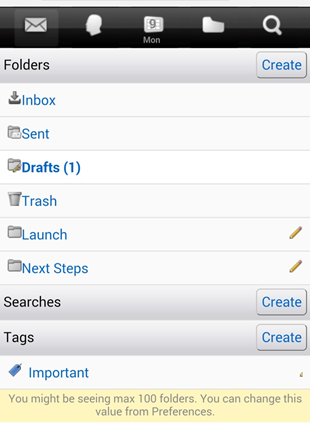
Replying to or Forwarding an Individual Message Step 1. To reply to or forward an individual message, tap the page corner button at the lower right of the message Step 2. Tap Reply Step 3. Select reply, reply to all, or forward the message Moving a Conversation or Item to Trash - Select the item you want to place into the trash, and tap Trash Marking a Message as Spam - You can mark an individual message as spam by first tapping on the page corner button, then Menu and select Spam. The message is moved into your Junk folder. Using Folders, Searches, and Tags - Folders, searches, and tags are shown in the overview pane that slides in from the left. To display the overview pane, tap Menu. Your Folders display at the top of the overview pane, and you can scroll down to see Saved Searches and Tags.
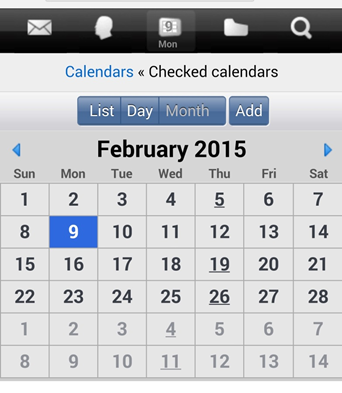
Step 1. To view the contents of a folder, tap the folder Step 2. A folder with subfolders displays an expansion arrow on the right of the folder name. Tap the arrow to display the list of subfolders. Step 3. To view the results of a search, tap Search Adding a New Folder Step 1. From the overview, tap Edit Step 2. At the bottom of the overview, select New Folder Step 3. Enter the Folder name and Location Step 4. To select a location, tap the Location field and select the location where you want to place the new folder Step 5. Tap Save Adding a New Tag Step 1. From the overview, tap Edit Step 2. At the bottom of the overview, select New Tag Step 3. Enter the Tag name and select a color for the tag Step 4. Tap Save Editing Folders and Tags Step 1. From the overview, tap Edit Step 2. Tap the folder or tag you want to edit • When editing a folder, you can change the name or parent folder, or move to it trash • When editing a tag, you can change the name or color, or delete the tag Step 3. Tap SaveHow to Use ContactsYou can access your contacts using the Contacts application. Accessing Your Contacts - From the Applications menu, tap Contacts to display your list of contacts Adding a New Contact - From the Contacts menu, tap Add and the New Contact dialog displays. Enter your new contact information and tap Save. Accessing Your Address Books - From the Contacts menu, tap Menu to display your address books How to Use CalendarsYou can access your appointments and meetings using the Calendar application Accessing and Viewing Your Calendar - From the Applications menu, tap Calendar to display your calendar. You can view your calendar by the month or day. All calendars and events you own or belong to display in your default calendar view. In month view, a day with any events will display a dot. In day view, a description of the event appears in its time slot. Viewing an Individual Calendar - You might have or belong to more than one calendar. By default, all your calendars and events display in your default calendar view. To view an individual calendar:
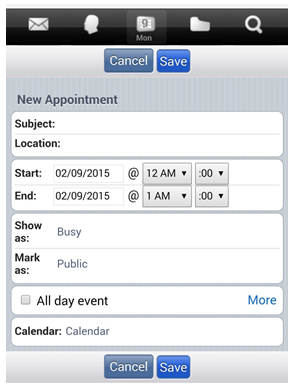
Appointment Colors - The color of an appointment depicts what calendar the event belongs to. You might have more than one calendar, or view someone else’s calendar, and each calendar can have a color associated with it that you assign in the Web Client. You can distinguish from the Month or Day view what calendar the event belongs to by the color associated with the event. Adding a New Appointment - To add a new appointment to your calendar: Step 1. Tap Add, the New Appointment dialog displays Step 2. Enter your new appointment information Recurring Appointments - When adding a new appointment, you can select to make it a recurring event. Tap Repeat when creating the event, and you have options to make the appointment Every Day, Every Week, Every Month, or Every Year. When viewing or editing a recurring appointment, you have the option to open a single instance of the appointment, or the entire series. Editing an Appointment - You can edit an appointment, including editing the time and date, or adding new attendees to the appointment. Editing the Date and / or Time of an Appointment - To edit an appointment that you created: Step 1. Tap the appointment. You can open the instance of the appointment, or open the series if it is a recurring meeting. Step 2. Make changes to the appointment Step 3. Tap Save Please Note: If you make changes to an appointment that you did not create, you will receive a warning stating the changes that you make apply only to your local copy of the appointment. Changes made by the organizer will overwrite your changes. Responding to an Invitation - When you receive an email invitation to a calendar event, you can indicate your response as accept, tentative or decline. You can also edit an invitation response that is already on your calendar. Step 1. Tap on the event you wish to edit Step 2. Select to open the instance or series Step 3. Tap the menu button and select Accept, mark as Tentative or Decline the event Deleting an Appointment - If you wish to delete an appointment, view the appointment and tap Trash. This action deletes the local copy of the appointment. |
|
|||||||||||||||||||||||||||||||||||||||